Wednesday, December 19, 2012

Countdown to Christmas!

I looked at the calendar today and realized that it is now less than a week until Christmas!  I don't know where the time between Thanksgiving and Christmas goes or why it always has to disappear so very quickly.

This year I have been busily crafting away.  I'm sure that several of my projects will end up as blog posts when time permits.  I've made baby sweater sets for two different baby showers, and another for a Christmas gift.  I can't wait to share the patterns that I found!  I have also made a couple of earflap hats that I am mighty proud of.  I've made two 2nd birthday cakes for my little boy (I'll explain later.) I'm also hoping to work in some time for jewelry making over my holiday break.  I've also gotten a request to replicate a vintage baby sweater.

For a preview of things to come, feel free to have a look through my Flikr feed!

In the meantime, please enjoy one of my favorite Christmas recipes.  This is my standby for EASY chocolate truffles.  Folks always rave over them and have no idea how simple they actually are.

Oreo Truffles

Ingredients:
1 package Oreo cookies
1 package cream cheese
Chocoloate coating (I usually use Candiquik.)

Directions:
Open the Oreos and dump them in the food processor.  Kick up the spurs and pulverize those little suckers into dust!  Add the cream cheese and let 'er rip again.  Once the cream cheese is fully mixed in (no more white swirls), it is time to roll them into balls.  I make mine on the small side (about 1 tablespoon) so they can be eaten in a single bite.  It is perfectly fine if you make them bigger, if that is what you prefer.  As I roll them out, I put them on a wax paper or parchement lined pan.  Next, I put them in the fridge or freezer to chill them and make sure they are plenty firm. 

Now it is time for dipping!  Melt the chocolate according to the package directions, and go to town!  I am the world's worst chocolate dipper.  I usually start out with "Willie Wonka and the Chocolate Factory" intentions, but end up with "I Love Lucy" results.  I really hate it when my middles sink through the chocolate coating on the bottom, so this time around, I used a two-step process for dipping.  First I dipped each piece halfway and let the chocolate set.  Then I went back and dipped the other half, placing it on the already hardened side to let the top side set. 

Yield:  65-70 truffles. 

Monday, December 3, 2012

I Love Kitties!

I love making crocheted goodies for babies.  I especially love it when I get a chance to make something more challenging than the standard baby beanie hat.  I was browsing through patterns on my beloved Ravelry when I happened upon this Hello Kitty Hat.  I can't say that I really followed the directions.  I mainly used the pattern for the bow.  However, if you are looking for a good pattern, this is the one I'd recommend.  I find that a lot of the homemade Kitty items just don't have the face quite right.  Either the eyes are not the right size or they are set too high on the face.  I did a Google image search to compare with just to make sure I was getting Kitty's face just right. 
I can't say that my Kitty hat was perfect.  I couldn't find the exact shade of pink that I really, really wanted, and I can always find things that I wish I had done differently, but I think it turned out Ok. 


Kitty Hat

It fit our sweet little niece perfectly too!  I hope she enjoys wearing it.  Here she is having a little nap with Miss Kitty.


Sweet dreams!


Thursday, November 15, 2012

Santa's Baby Set, Part III: The Diaper Cover

I am so excited that I have finished the last of the Christmas photo prop set that I promised to make for our nephew. I will deliver it to him next week, and I can't wait to see how his pictures turn out. I am biting my nails hoping that I got the sizing correct. None of the individual pieces took a long time to make, so I'm sure I could call a "do over" if necessary, but I'd much rather not have to do that.

So without any further ado, here is the completed set! 

Santa's Aviator Set

For the diaper cover, I loosely followed the Newborn Diaper Cover pattern by Casey Braden.  It is listed on Ravelry, and is available on Casey's blog.  Since our nephew is a chunky little monkey of a 3 month old, I adjusted the pattern for a larger waistband and added some width to cover his little behind.  I also added a second button to mimic the buttons on the hat. I really like that the cover is adjustable around the waist. 

In case you missed them, here are links for more information about the other pieces of the set:
Santa's Aviator Hat
The Booties

Wednesday, November 14, 2012

Santa's Baby Set, Part II: Aviator Hat

I made this sweet little hat as part of a set for our 3 month old nephew to wear in his Christmas pictures. 


Here is my pattern:

Santa Aviator Hat

I used red worsted weight yarn (I Love This Yarn! from Hobby Lobby) and an H hook.  The trim is fluffy white baby yarn worked with 2 strands held together.  This pattern is mainly worked in rounds.  A specific gauge is not important as long as you measure along the way. 

First, let's make the crown.  This will be the flat disk at the top of the hat that determines the actual size.  We will work in rounds, increasing until we get the size we want. 

A note on size:  I made this hat to fit my 3 month old nephew.  His head measures about 17 inches.  To adjust the size for a larger or smaller head, simple add more increase rounds until the circle is the right size.  In case you forgot your geometry classes:  you can measure across the circle (diameter) and multiply it by 3.14 (pi) to get the circumference of the circle.  At Round 5, my circle was about 5 inches.  5 x 3.14 = 15.7 inches around.  These types of hats stretch, so it is good for them to be 1 to 1 1/2 inches smaller than the actual head measurement.  Trying to guess what size to make?  Here is a great resource for measurements.

Working in Red
Round 1:  Starting with a magic circle, work 8 DC.  Slip stitch to close the ring.  Tighten up the circle.
Round 2:  Chain 2, then DC Increase (2 DC in on stitch) all the way around.  Slip stitch to join.  (16 stitches).  Note:  I count the Chain 2 as the first DC.
Round 3:  Chain 2, then *1 DC Increase, 1 DC* Repeat all the way around.  Slip stitch to join (24 stitches).
Round 4:  Chain 2, then *1 DC Increase, 2 DC* Repeat all the way around.  Slip stitch to join (32 stitches).
Round 5:  Chain 2, then *1 DC Increase, 3 DC* Repeat all the way around.  Slip stitch to join (40 stitches).  Gauge:  At this point, my piece measured about 5 inches. 

Now it is time to add the height of the hat.
Round 6-10:  Chain 2, then 1 DC in each stitch all the way around.  Slip stitch to join.  (40 stitches).  Note:  You can adjust the height of the hat by adding or omitting rows in this section.

Earflaps
Row 1:  Starting from where you left off with the rounds, Chain 2, then 7 DC. (8 stitches)
Row 2:  Chain 2, DC2TOG (Decrease), 3 DC, DC2TOG
Row 3:  Chain 2, DC2TOG, 1 DC, DC2TOG
Finish off and cut the yarn.  Don't worry about working in the tail as we can crochet over it when we add the trim.

To add the second flap, skip over 24 stitches from the first flap and attach your yarn.  Repeat the steps for the first earflap.

Now for the front flap and the trim.
Row 1:  Working in white, attach your yarn 1 stitch away from the earflap and DC across ending 1 stitch before the other earflap. 
Row 2-3:  Chain 2, DC across
Finish off and weave in tail.

For the trim, attach next to the front flap and work HDC all the way around the edge.  You may find it necessary to add stitches in the corners to make the trim lay properly.

Add the strings.
Cut several lengths of yarn and thread them through the center of the bottom edge of the ear flaps, then braid or twist them into one cord.  Tie them off and add pompoms at the end, if desired.
Attach the buttons on the flap to hold it up.


Monday, November 5, 2012

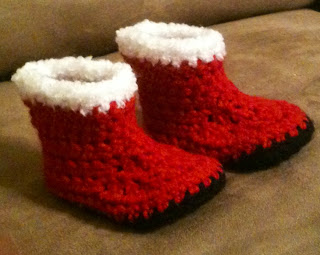
Santa's Baby Set, Part I: Booties

My husband's little sister has requested a set of Santa themed baby items for her 3 month old son's Christmas pictures.  She found a set on Etsy that she really liked and asked if I could do something similar.  I was glad to accept her challenge, and quickly got started.  The set includes a sweet little Aviator hat, a Diaper cover, and these booties.  (I'll post pics and instructions for the hat and diaper cover as soon as they are done!)


Santa Booties!

Believe it or not, I had never made a pair of booties, so I went to my favorite resource for patterns:  Ravelry!  If you knit or crochet, Ravelry is wonderful place to find ideas, patterns, information about materials, and get to know other folks with similar interests.  Best of all, there is no charge to become a member and it only takes a few minutes to set up your profile.  If you are already a member, look me up and send me a friend request!  My username is Chuckjenn.

The pattern I selected for the booties was Assorted Baby Boots by Barbara Bazzocchi.   This is available as a free PDF download through Ravelry.  What I love about the pattern is that it shows you how to take a basic item and make small changes to suit your preferences.  The same basic pattern can be used to make Ugg boots, moccasin boots, or ballerina slippers.  It just depends on what choices you make. 

Using the basic pattern, I worked the soles in black and the upper part in red.  I made the last round of the boot with 2 strands of fluffy white baby yarn. 

Monday, October 22, 2012

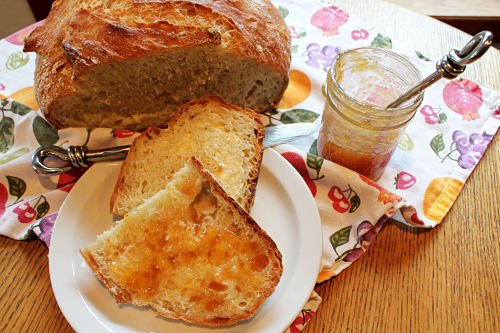
The Pinterest Bread Fiasco

Yes, I will admit it.  I am totally addicted to Pinterest.  I love to waste time scrolling through endless pins that promise untold levels of blissful creativity.  This weekend I guess I was craving a culinary adventure, so food pins were catching my interest. The title of my Pinterest recipe board is "Food Porn".  I feel that it is aptly named because the images posted there are meant to cause lust in the eye of the beholder while the end product is unattainable and usually unfulfilling. 


Mmmm...Homemade bread.  Mouth watering, right?
 This weekend I fell victim to the false hope of making homemade bread effortlessly in my cast iron dutch oven.  The pin bragged  that the bread "tastes like expensive restaurant artisan bread, but literally takes 5 minutes of work. Chewy and soft on the inside, crisp and crunchy on the outside."  I looked at the list of ingredients - flour, yeast, salt, and water.  That sounded simple...too simple.  I should have known better, but with my husband eagerly encouraging me to discover the secrets of breadmaking, I decided to try it. 

I mixed up the ingredients and let it sit overnight for the first rise.  Everything looked just as it should until it came time to turn the dough out and form it into a ball for the second rise.  The pictures showed a beautifully formed ball of silky smooth dough.  What I had was a big, glob of ooky, sticky, gummy mess.  I meant to take a picture, but my hands were too glopped up to even think about it!  By the time I got done wrestling 'the blob', as I referred to it in my head, I was seriously regretting my decision making capabilities.  Determined to make it work, I perservered.

The recipe says to heat the dutch oven for 30 minutes at 425-450 degrees.  When I opened the oven door, I realized that the pot was smoking.  It had the sickly overheated Crisco smell.  The comments on the recipe had mentioned the possibility, so I just kept forging on.  I dumped my poor excuse for bread dough in the pot, put on the lid, set the timer, and hoped for the best.

When it was done, I took off the lid and my hopes for a miraculous transformation were completely squashed.  My bread was ugly.  There was no getting around that point.  I just hoped that it tasted good.


The Bread of Frankenstein!
The crust on top was crisp as promised, and the bottom was downright hard.  I couldn't cut it.  I had to just break off the slices.  The inside was chewy alright.  I baked it to the required 200 degree internal temperature, but it was still a bit gummy.  The worst parts were that in places it tasted like the smoke from the pot, and there were little flour pockets throughout from my completely incompetent preparation of the dough ball. 


The Autopsy

Will I try this recipe again?  Dunno.  If I do, I'll be doing a little more homework first to compare other recipes and tips for breadmaking.  Don't get me wrong.  I'm not saying that the recipe isn't good.  I'm just saying that it didn't work well for me.  Maybe I missed something or just plain screwed up, but it definitely did not deliver the "artisan quality" bread that I was lusting after.

Tuesday, October 9, 2012

C is for Cookie!!

A week or two ago, we were strolling through the grocery store for our weekly stock up run when my oldest son stopped to admire the refrigerated cookie dough section.  Usually I wheel quickly past since I prefer to make my cookies from scratch.  This time I let my son convince me that it would be good to have some ready-made chocolate chip cookie dough on hand.  He suggested that we could just keep it in the fridge and eat it raw.  (Isn't it funny how kids figure out how to exploit our weaknesses??)  In some sense of duty to make sure that he understands that you aren't actually supposed to eat it raw, I suggested that we make a cookie pizza and decorate it with icing.  He agreed and we headed on about our business. 

Once we got the dough home, it was loaded in a drawer of the fridge and promptly forgotten (by me anyway).  A couple of weeks later, my son ran across it and reminded me of my promise.  So once little brother was down for a nap, we rolled it out.  Well, maybe it was closer to pounding.  That stuff is very hard when it is cold!

Tip:  We rolled it out between two layers of parchment paper.  When it was the desired thickness, we peeled off the top layer and slid the rest onto a cookie sheet.  No mess = No cleanup!!

Once the cookie was baked to golden brown and delicious perfection...it was bedtime.  So we wrapped it up for the night and came back to it the next day!  Parting is such sweet sorrow...

Anyway, the next day I started getting together my ingredients for the icing.  I usually use all butter, but I didn't have enough.  I decided to subsitute with butter flavored Crisco, and I was very pleased with the end product. 

Here is the recipe that I used:

Buttercream Icing

1/2 cup butter
1/2 cup butter flavored Crisco
4 cups powdered sugar
1 Tbsp vanilla flavoring
1 Tbsp milk

I never remember to soften my butter in advance, so I usually throw the cold butter in my KitchenAid mixer and beat it into submission.  Once it gets creamy, you can add the Crisco. 

Next, it is time to work in the powdered sugar at low speed.  (BTW, I never sift it first.  I figure that the mixer can break up the lumps.  I haven't had a problem yet!)

Once the sugar is in, it is time to add the vanilla.  Make sure that you shake it up well before you measure it out.  The good stuff settles to the bottom when it is on the shelf. 

The last step is to adjust the consistency.  Add milk 1 tablespoon at a time until it is thin enough to pipe or spread.  If you do too much, you can compensate by adding a little more powdered sugar.  This is also the time to add color, if desired.

What you end up with is a bowl full of fluffy goodness that is ready to spread or pipe onto the confection of your choice. 

Finally, here is a picture of our end product.  Keep in mind that it was completely decorated by my 9 year old son.  Ok, I admit that I helped a bit with the border.  By the time we were finishing up, he had gotten bored with decorating and just wanted to eat the leftover icing with a spoon.  Kids!


My son's yellow buttercream castle cookie pizza.


Tuesday, October 2, 2012

Mmm...Chocolate!

It was almost bedtime when I went to the refrigerator looking for "a little something", a treat to satisfy my sweet tooth without requiring too much effort. Standing there gazing into all of the chilly options, my eyes came to rest on a brown plastic bottle of chocolately goodness. (You know the one. I believe it is standard equipment for any family fridge.) I poured myself a tall glass of cold milk and picked up the bottle to start the ritual of preparing chocolate milk, but it seemed a little too light. I shook it for all I was worth and held my breath as I attempted to squeeze what was left of it's contents into my glass. I was rewarded with an insulting rasping sound that would have been sure to reduce my 9 year old boy to giggles. We were out of chocolate syrup!

My mind began to race thinking of other options, and I vowed that I would find a recipe for homemade chocolate syrup. So over the next couple of days I did a little internet research and found that there are lots of recipes out there. They have a lot of things in common: sugar, cocoa powder, vanilla, water. Those are common staples in my home, so I decided to proceed with the chocolate syrup project as soon as I found a moment's peace (traslation: as soon as hubby and the kids laid down for a Sunday afternoon nap).


Once that moment arrived, I pulled up Alton Brown's Cocoa Syrup Recipe and went to work. The instructions were clear and easy to follow. I only wish that I had read more carefully. After I got things boiling, I realized that my pot was a bit on the small side. This meant that it kept coming dangerously close to boiling over. I had to watch it like a hawk, removing it from the heat when it got too close to the edge. The other thing that I didn't pay close enough attention to was that the recipe called for corn syrup. (The only time I keep that in the house is when I'm making brittle at Christmas.) I left it out and hoped for the best.

My end result was a nice rich chocolate syrup that has been blessed by all members of my household. It is not quite as sweet at the store bought variety, and has a darker, richer flavor. The consistency turned out quite well after it cooled and spent some time chilling in the fridge.


Friday, September 28, 2012

Is there a crafty gene?

I grew up in an atmosphere surrounded by people who loved to craft.  So I guess you could say that it is in my blood. 

My Grandma Ruby could have taken Martha Stewart with one arm tied behind her back any day.  She could cook and rarely needed a recipe.  She crocheted like the wind.  It think she could replicate any pattern if you'd just give her a few minutes to look at the finished object you'd like her to copy. Give her a pile of yarn and help her find her "good hook" (she was always misplacing it and blaming the kids) and she could come up with a beautifully designed project that would knock magazine editor's socks off.  She could sew anything you needed.  She even made extra spending money sewing for others.  And I was lucky enough to grow up in her presence.  I soaked up as much of her creative mojo as possible.  I inherited her collection of crochet hooks, and I consider them among my most prized possessions. 

My Grandma Martha was just as crafty and creative as Grandma Ruby.  She was adventurous in her pursuits.  She is where I get my "try anything once" attitude.  She was a gifted seamstress.  I never heard of anyone else who would sew homemade work gloves just because she had the materials and thought she could figure it out.  She quilted in the wintertime and gardened in the summer.  She wasn't afraid to try her hand at the scroll saw to cut out wooden blanks for painting either. 

The thing is that neither of these super special ladies considered themselves "crafters".  They were just country women who knew how to meet the needs of their families on limited resources.  As I grew up and started my own family, I have realized that these ladies are a dying breed.  There was nothing trendy or cool about what they did.  There were just down-to-earth ladies who were taking care of business.

Now, I am raising two boys of my own.  My oldest (9 years old) has always loved to cook and craft.  When he was little he would ask if we could "make" together.  In the last month, he has taken up crochet, and I have to say that he has just about mastered the basics.  I only hope that I can live up to the example that my two grandmothers set as I try to pass down the skills that they taught me. 

Little Fall Pumpkin

I've been working on a large project lately, and I wanted to take a break to work on something that I knew I could get done quickly.  Since fall is my favorite time of year, I decided to make a little decorative pumpkin for my desk. 


This is my first go at writing down a pattern, so please be kind!

Here are the general instructions.  It works up much like the beginning of a beanie.

Stem: Work in Brown
Start with a magic circle
SC 8 stitches, connect the circle and tighten center.
Row 1 - 8: continuing in the round, complete 8 rows of SC (or until stem is desired height)

Pumpkin body: Switch to Orange
Row 9: SC 1 Increase 1 (2 SC in the same stitch), repeat all the way around
Row 10: SC 2, Increase 1, repeat all the way around
Row 11: SC 3, Increase 1, repeat all the way around
Row 12: SC 4, Increase 1, repeat all the way around
Row 13: SC 5, Increase 1, repeat all the way around
Row 14: SC 6, Increase 1, repeat all the way around
Row 15: SC 7, Increase 1, repeat all the way around
Row 16: SC 8, Increase 1, repeat all the way around
Row 17: SC 9, Increase 1, repeat all the way around
Row 18 - 27: SC all the way around
Row 28: SC 9, SC2TOG (single crochet decrease), repeat all the way around
Row 29: SC 8, SC2TOG (single crochet decrease), repeat all the way around
Row 30: SC 7, SC2TOG (single crochet decrease), repeat all the way around
Row 31: SC 6, SC2TOG (single crochet decrease), repeat all the way around
Row 32: SC 5, SC2TOG (single crochet decrease), repeat all the way around
Row 33: SC 4, SC2TOG (single crochet decrease), repeat all the way around
STUFF while the hole is big enough to work with!
Row 34: SC 3, SC2TOG (single crochet decrease), repeat all the way around
Row 35: SC 2, SC2TOG (single crochet decrease), repeat all the way around
Row 36: SC 1, SC2TOG (single crochet decrease), repeat all the way around
With a large needle, close the hole and stich from the bottom up through the top of the pumpkin to create ribs.

Vine: Work in Green
CH to desired length.
Work 2 SC in each chain.
Attach at the base of the stem.